The Bifarm Journal · · by Wanjun Gao
Bifarm AeroKit ver. 1 Part List
If you‘ve been wanting to build your own automated Aeroponics system, or if you’re curious about the components included in a AeroKit — this blog is for you. Please read on.
Early on, we would ship the AeroKit as partially assembled package, and instruction only covers the process of assembling (no details about the parts were provided).
To help users to better understand the Bifarm AeroKit and customize it, here is supplemental information you might find interesting. This blog will break down the AeroKit into 3 sections:
Overview of part list
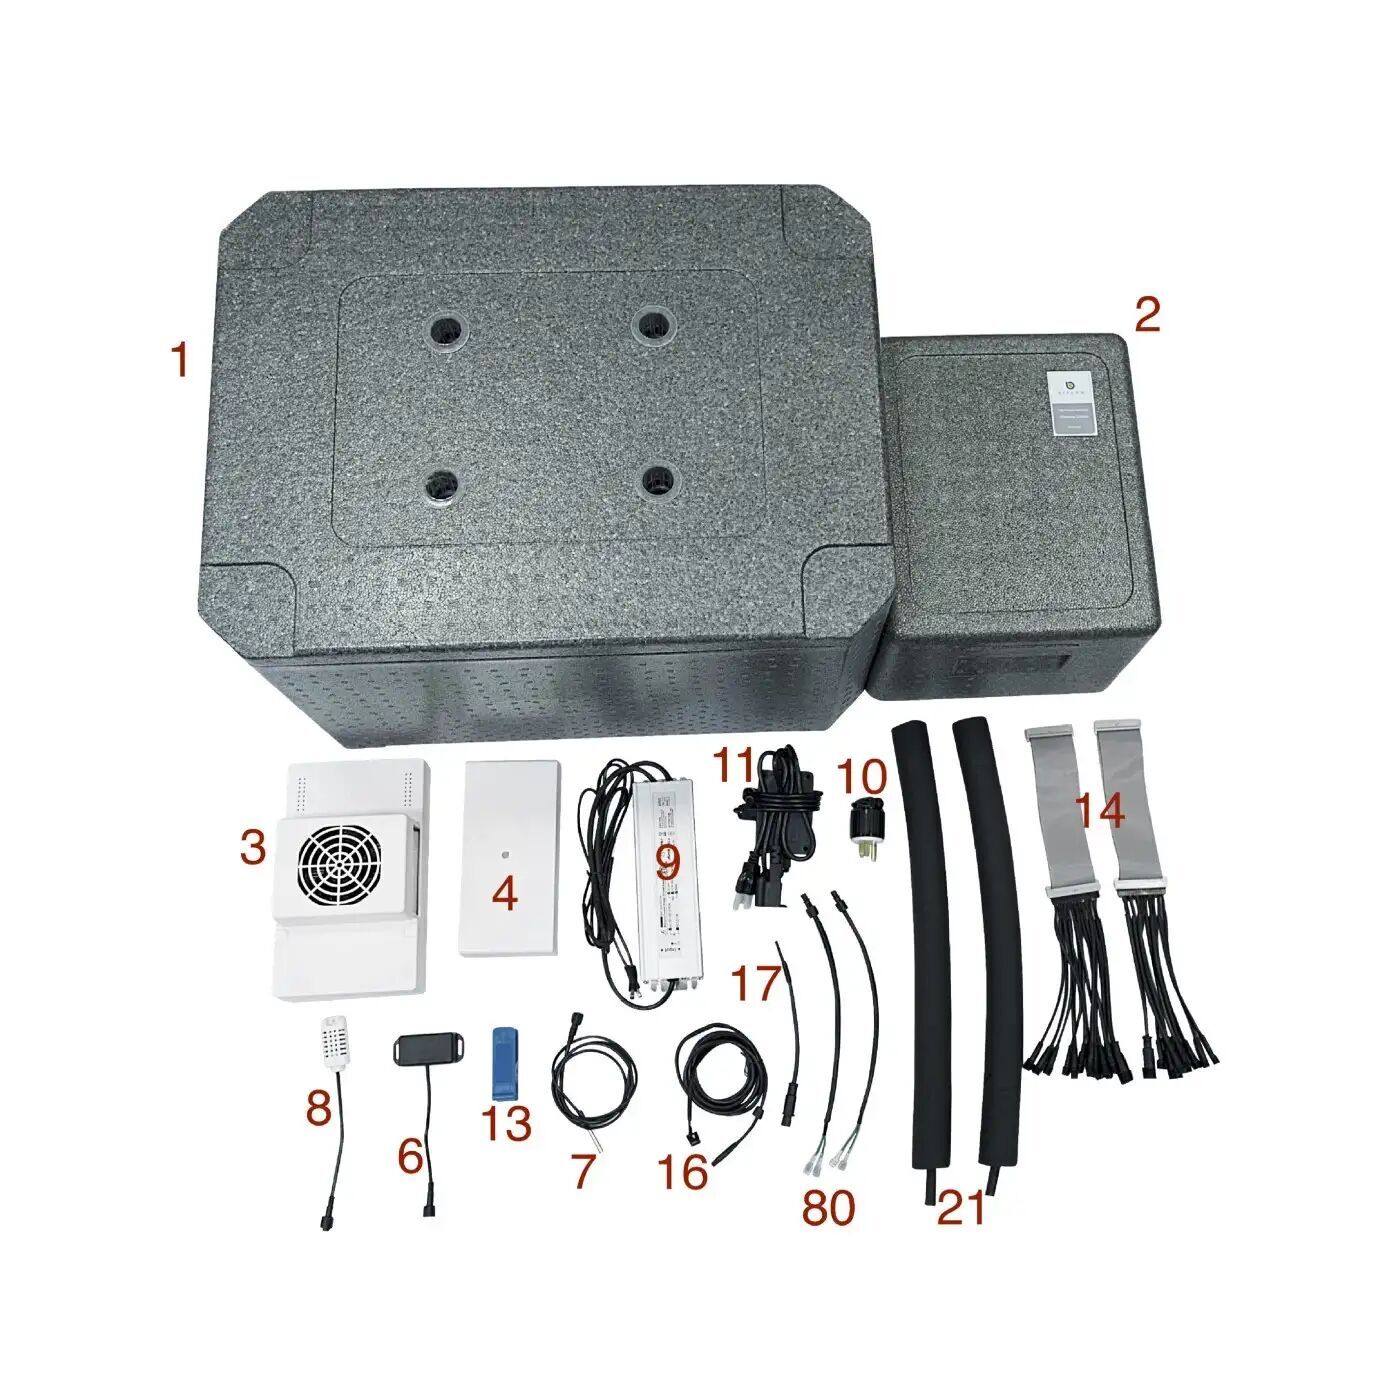
Ver. 1 comes with the following parts (and some additional bonus tools):
Part list of AeroKit
The Bifarm AeroKit includes 3 major components and associated accessories.

Root Chamber
Pressure Regulator
Temperature Control Unit
Smart Controller
Bracket Board (for Smart Controller)
Ultrasonic Distance Meter
Root Temperature Sensor
Climate Temperature / Humidity Sensor
Power Supply
110VAC Power Plug
Relay Controlled Power Cord
Net Pot & Collar
Tube Cutter
Wire Harness
Extension Cord for Level Meter
Temperature Control Unit Wire Extension
Security Key
Spare Atomizer Nozzle
Recycling Tube
Hand Pump (for priming Temperature Control)
Tube Insulation
Spare Clips for Quick Connectors
Liquid Level Sensor
Atomizer Nozzle assembly
Note:
(80) Connectors for Solenoids have been pre-installed in Pressure Regulator
(6) Ultrasound Distance Meter is no longer used for liquid level measurement. A newer type of level sensor (23) is included for this purpose. See instruction document at the end of the blog for details.

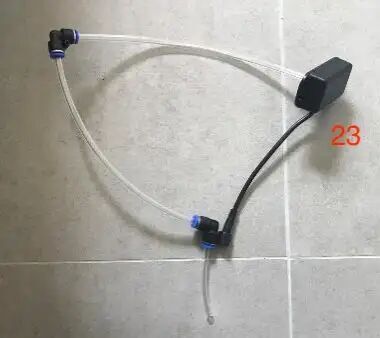
New Liquid Level Meter
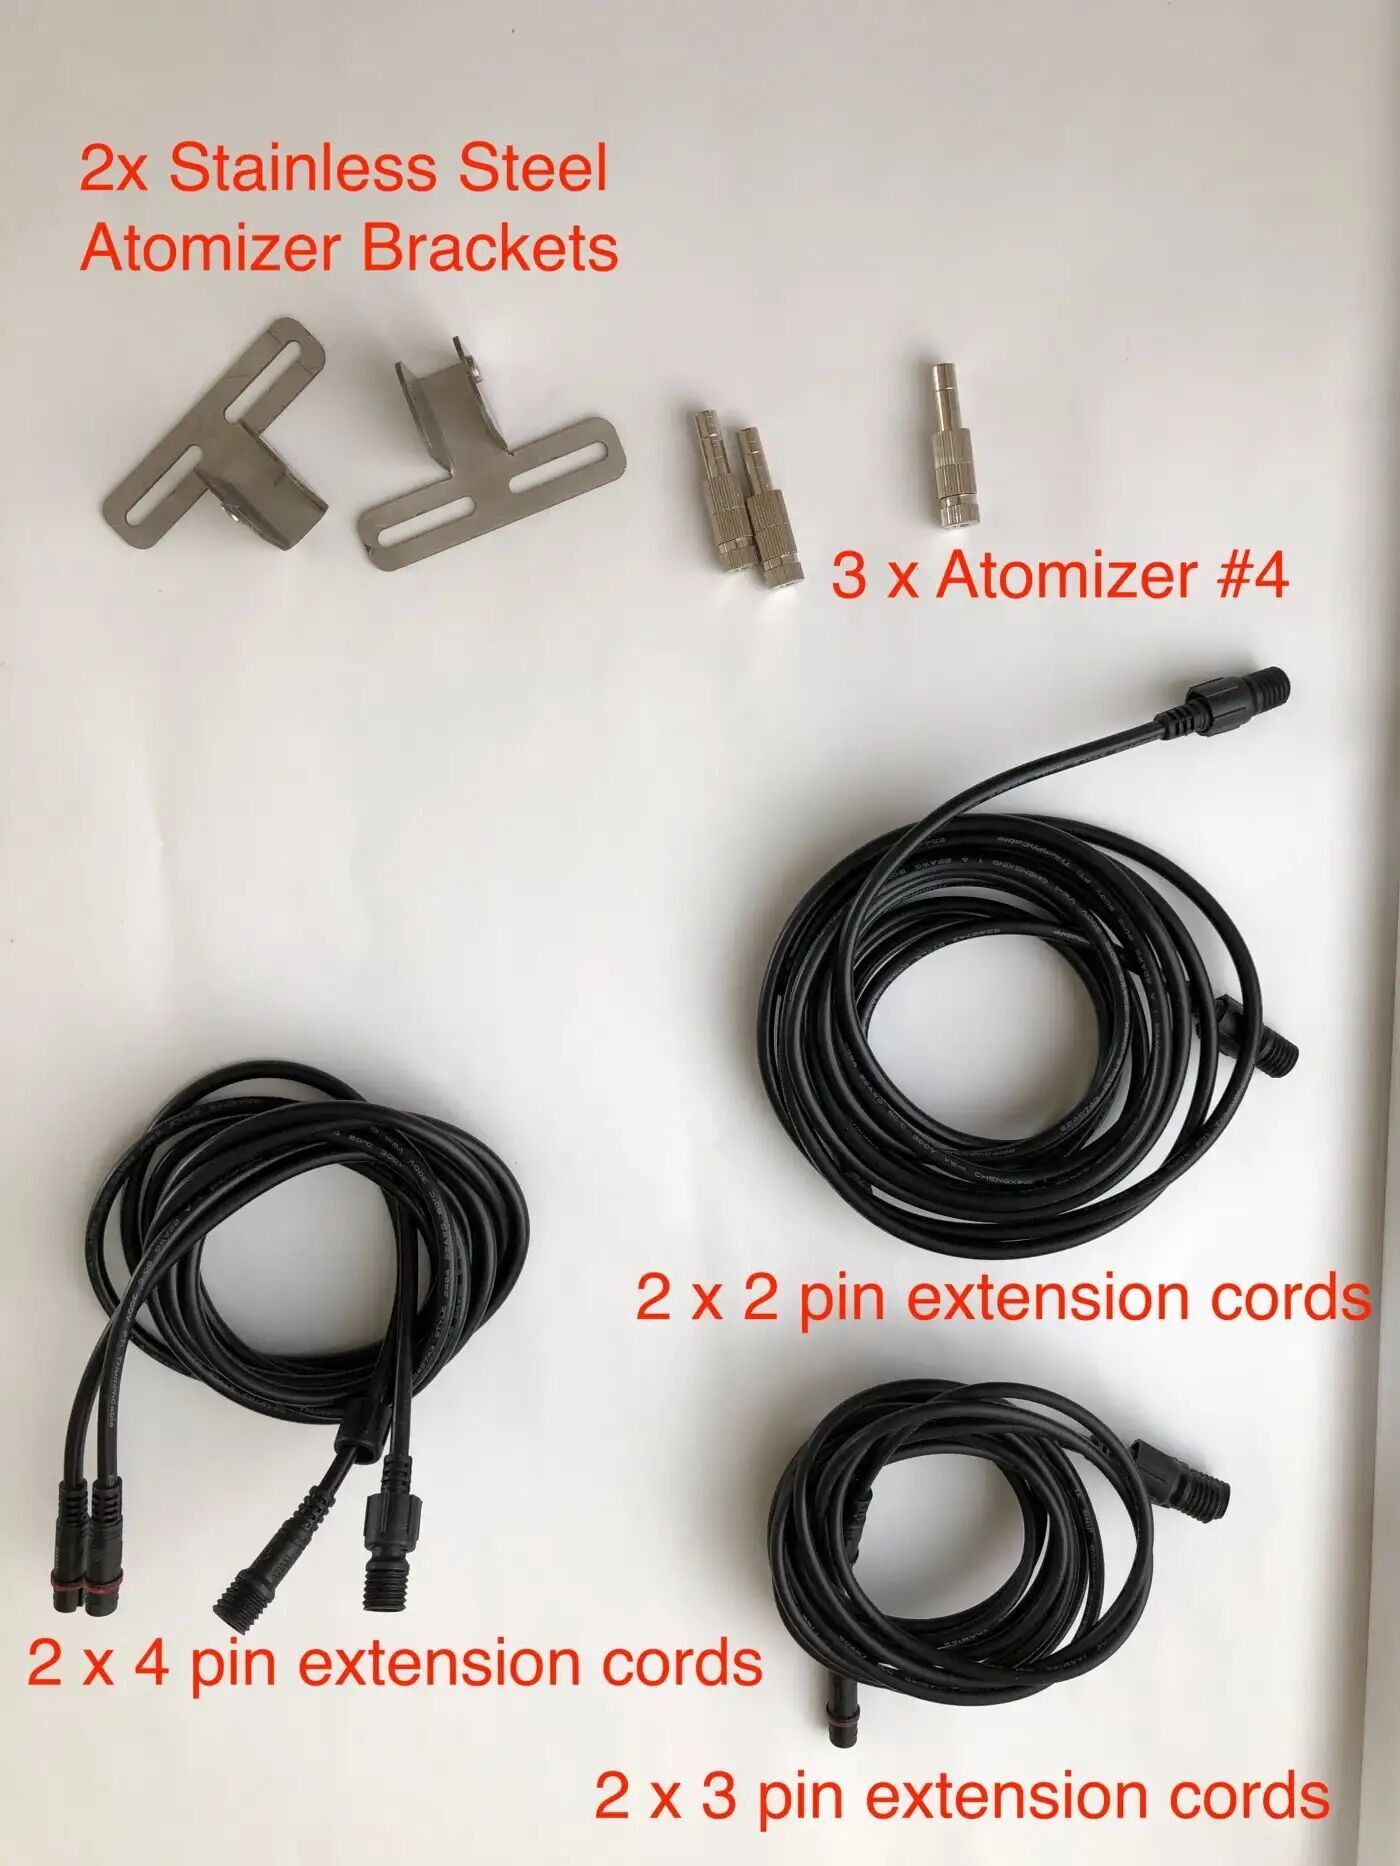
3. Bonus materials for AeroKit ver. 1 sold on Amazon:
Details of major components
Most of the components are self explanatory. Here are several major components we will show more details: Smart Controller, Pressure Regulator, Temperature Control Unit & Root Chamber.
A. Bifarm Smart controller — the brain of AeroKit. For details about the controller functions, check blog A Beginner’s Guide to Bifarm Smart Controller.
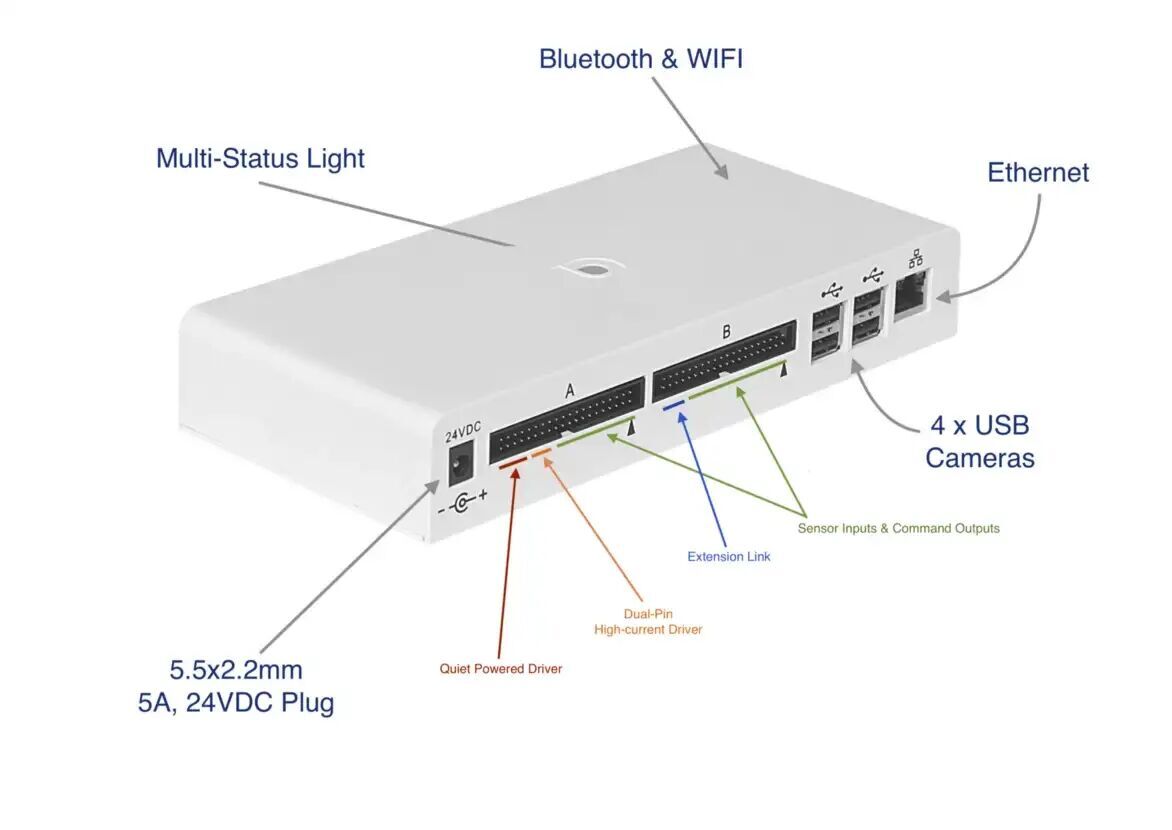
Bifarm Smart Controller
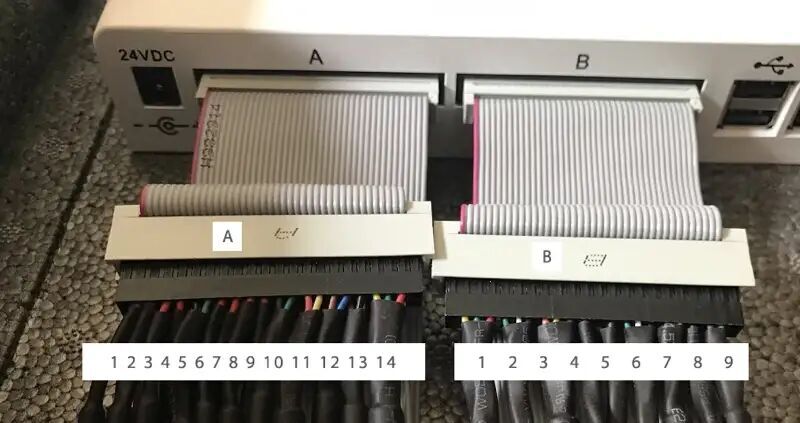
Smart Controller Wiring Diagram
Ver. 1
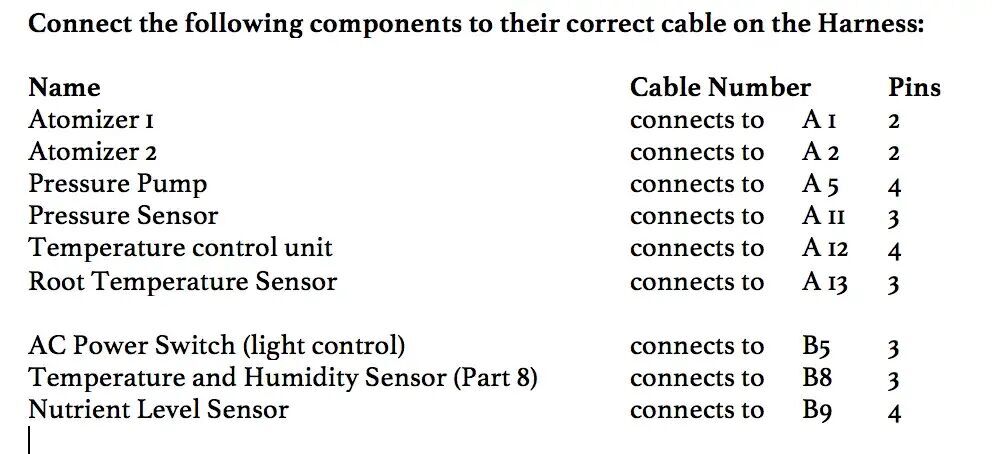
Ver. 1 connection diagram
Ver 1.1 difference from Ver 1
Only Atomizer 1 or 2 are used.
A3 is used for auto de-compressurization
B. Pressure Regulator — The high pressure aeroponics generator. Check blog Aeroponics — Pressure Regulating Unit
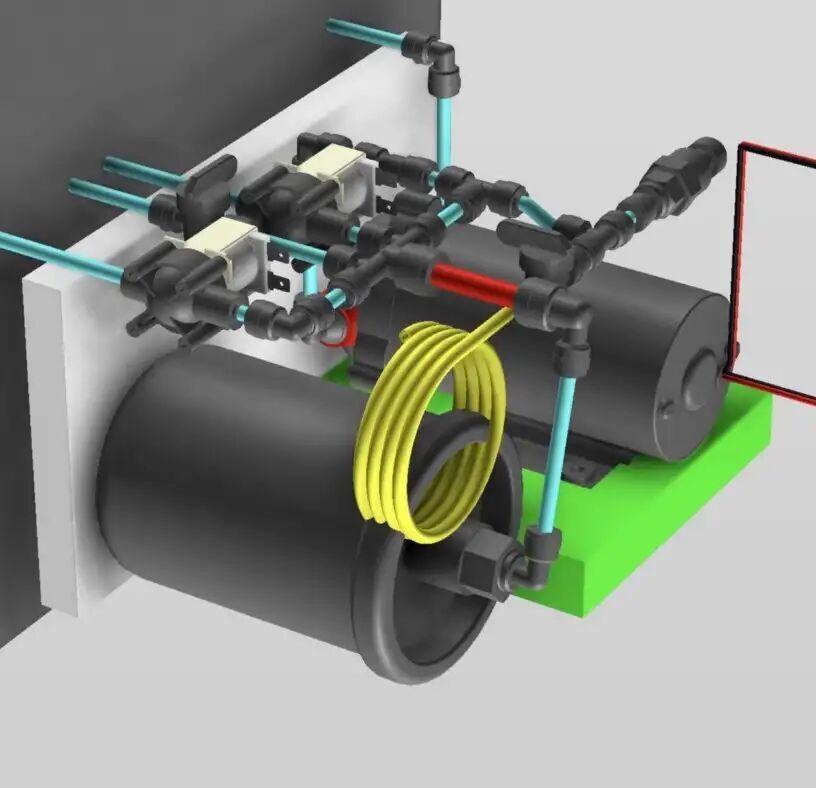
Pressure Regulator
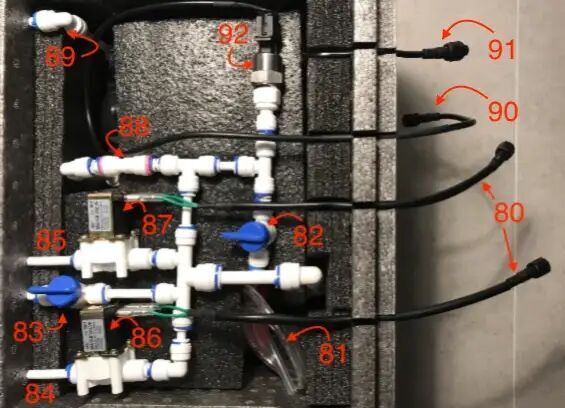
For version 1, the atomizers 1 & 2 are independent on each other. De-compressurization is done manually via valve (83).
80. Connector for Solenoids
81. Manual Drain Tube
82. Manual Drain Valve (It will drain through tube 81, when valve and pump are turned on)
83. Manual De-compressurization Valve
84. Output to Atomizer 1
85. Output to Atomizer 2
86. Solenoid for Atomizer 1
87. Solenoid for Atomizer 2
88. Stop Valve
89. Pressure Pump Intake
90. Pressure Sensor signal
91. Pump Power Cord
92. Pressure Sensor
For version 1.1 , the atomizers 1 & 2 are connected and controlled by one solenoid (84) from Smart controller A1 or A2. Manual valve is no used.
83. Not used
85. Output for auto De-compressurization
87. Solenoid for auto De-compressurization
C. Temperature Control — the Chiller & Warmer that keeps roots happy. Check out blog Aeroponics — Root Temperature Control.
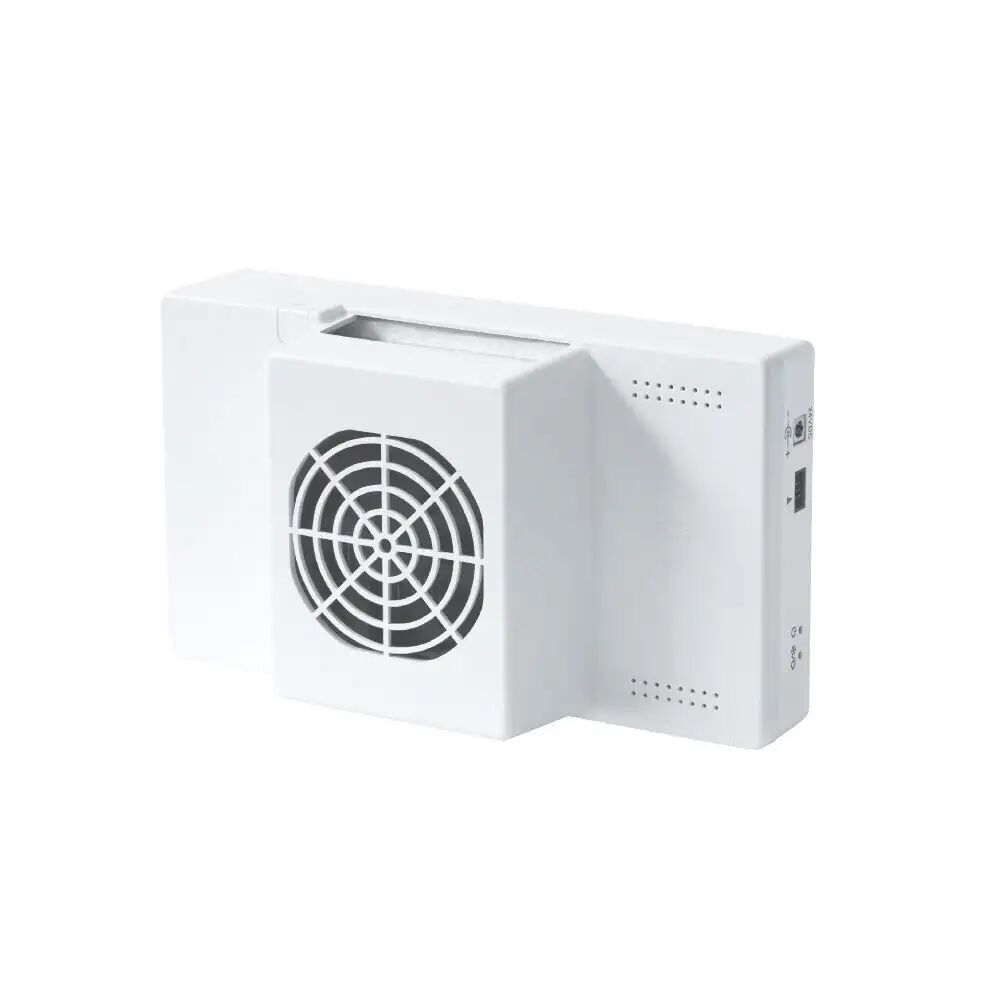

Bifarm Nutrient Temperature Control
There are several areas to pay extra attention to:
The Temperature Control Unit needs to be at the same height as the reservoir.
It needs to be primed for the first use. To prime the pump — first attach the tubes for intake and output to the Temperature Control Unit (make sure the tip of the intake tube is submerge under want at all time). Attach the hand pump to the output tube. Use hand pump to pump air from the temperature control & connected tube.
Make sure the proper ventilation is provided.
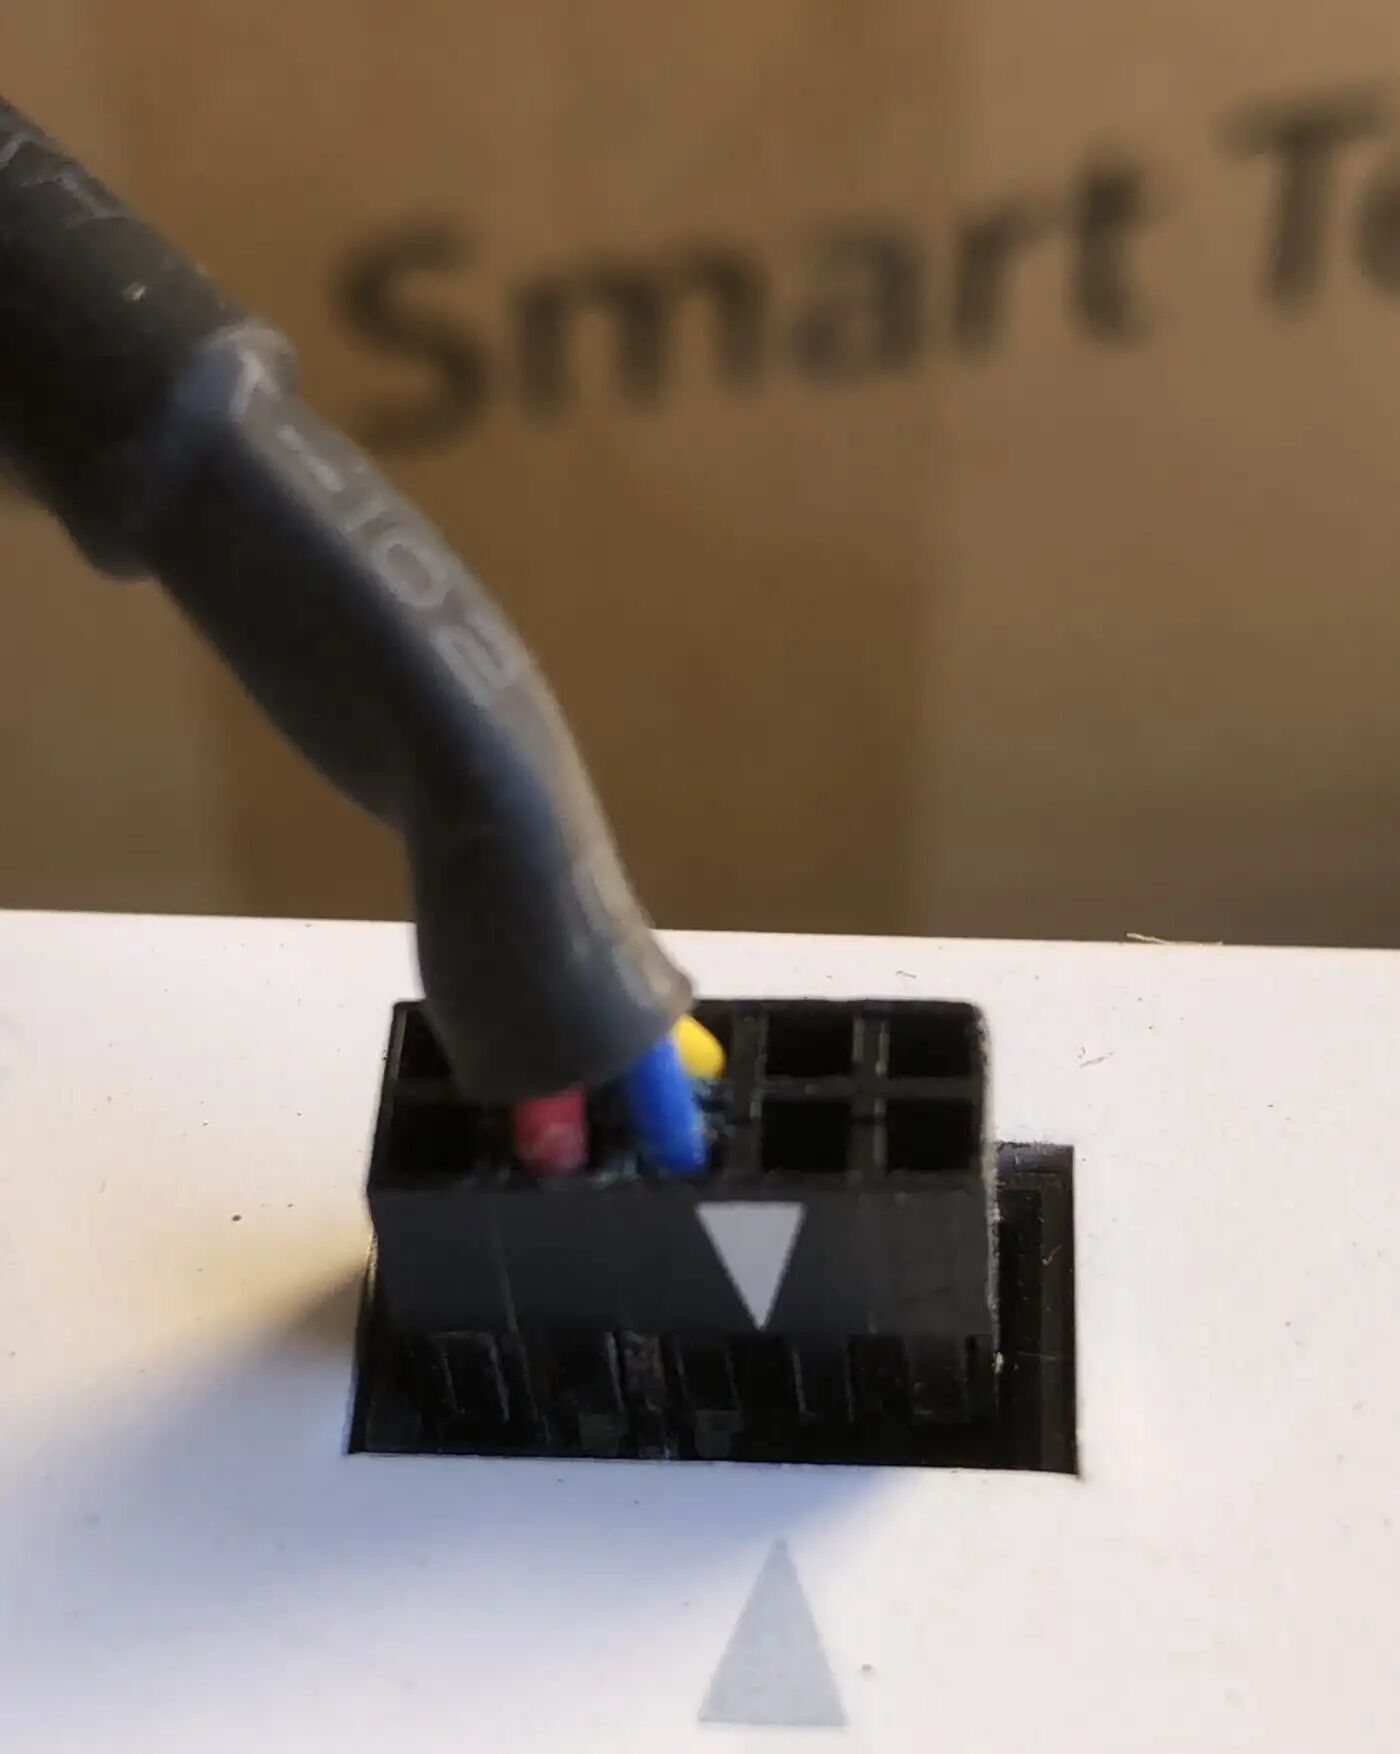
(Updated) Make sure the signal connector are plug in with signs lined up as in the following photo (Photo from my own kit, so it is a little dusty)
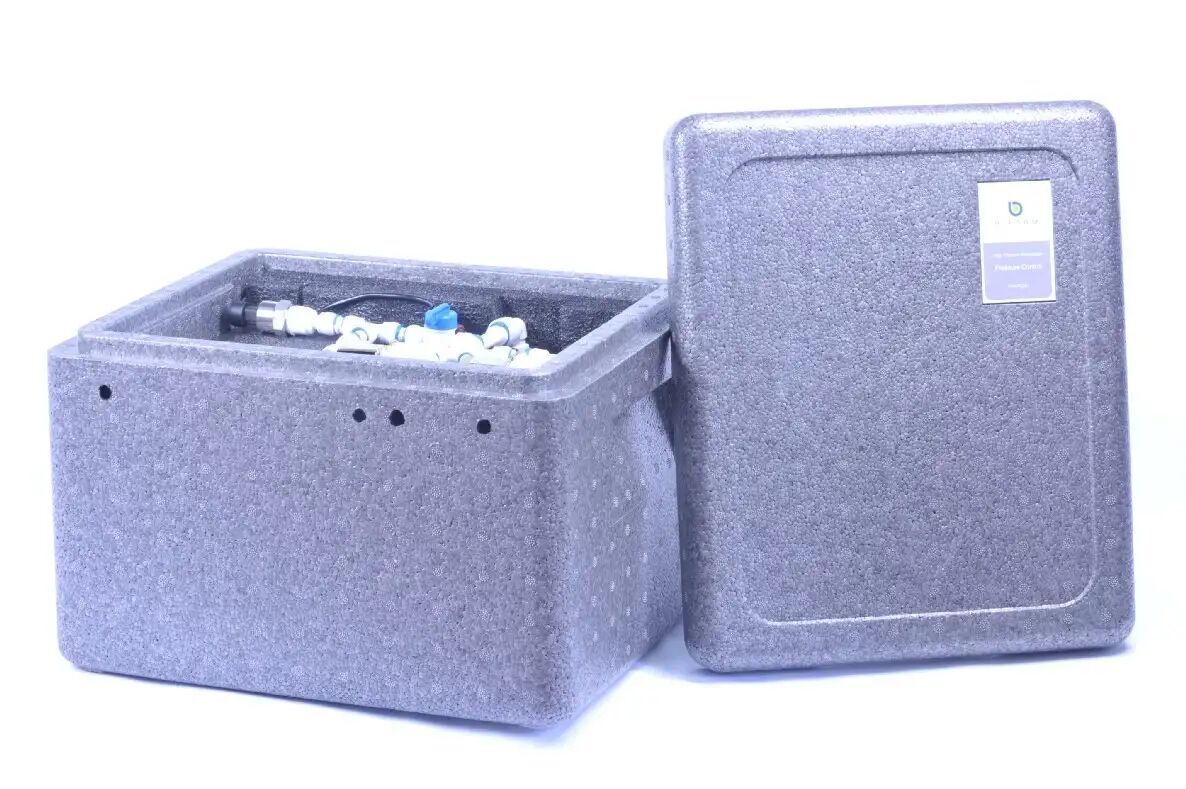
D. Root Chamber (optional)
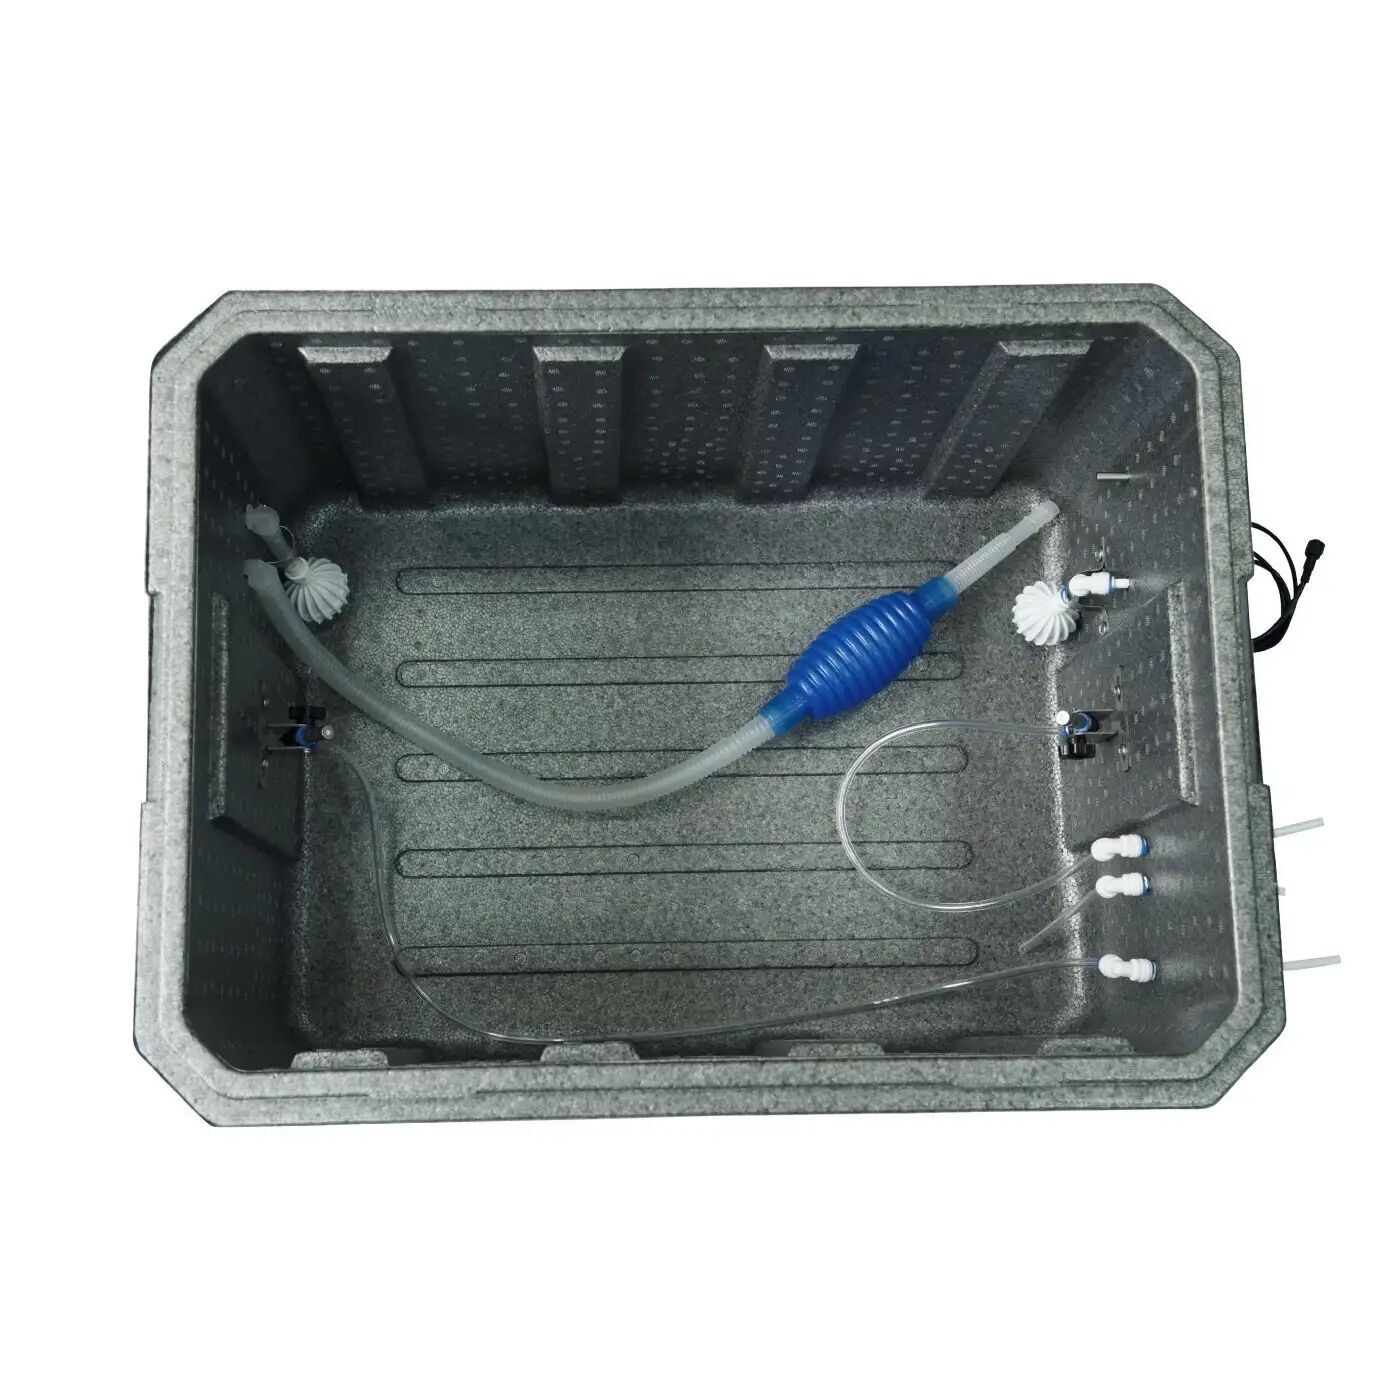
Assembled Root Chamber
Note:
This portion is optional, you can build your own root chamber too. Just remember to insulate the chamber to make effecient use of the temperature control and save electricity.
The packaging container coming with the package is made of EPP, a high quality material fit well for a root chamber. It is durable, light-weighted, easy to clean, easy to customize, and provide excellent heat & light insulation.
However, it might not be 100% leak proof. So if you use the packaging container as root chamber, you can use top plastic liner as leak proof layer. The installation instruction contains information of how to use the shipping container as root chamber. Both EPP container and plastic liner are made of food safe materials.
You can download AeroKit installation instruction, and read side by side along with this blog to have better understanding of the mechanics of the AeroKit. There are more information about AeroKit at http://aerokit.bifarm.com, including its features and how it works.
If you have questions, please contact us here. We will get back to you quickly.